Monday, December 2, 2013

Iron Quilter Challenge

It was quite a few months ago now when I discovered the splendors of the Missouri Star Quilt Company.  My quilty Grammom had been nagging me for what felt like decades to check it out, but being the procrastinator that I am…I kept putting it off.  Then one day a quilty friend posted a particularly spectacular "Daily Deal" on Instagram that prompted me to finally give in and check out the site.

Now it's official.  I'm a convert.  From what?  I don't exactly know.  What I do know is that the first thing I do when I wake up in the morning is grab my iPad off of the bedside table and go straight to the Daily Deal.  It's always exciting to see what marvelous pre-cut fabric or new-fangled change-your-life quilty tool is available at a steal-of-a-deal price.  And then there are Jenny's fun tutorials.  I love how she comes up with so many great ideas and shortcuts to make things quicker and easier.  Because let's be honest…there are only so many hours in a day and days in a lifetime.  I'll never have enough time in my life to stitch up all the things I want, so shortcuts are like tiny little victories.  Also, Jenny's videos are presented with lots of smiles and usually a couple jokes, which makes them even more fun to watch.

When I saw the MSQC video for Iron Quilter 2 a couple months ago, first I laughed out loud; then I thought what fun it would be to participate.  I've never entered any kind of quilting competition before, so I thought, "What the heck?  I'll give it a go."  I had an idea immediately and set to work with my graph paper.  When the secret ingredient "Lovely" charm packs arrived, I had fun sorting through them and seeing all the pretty prints.  I was happy that I had started work on the project early.  There was plenty of time to put together what I had in mind.

Then a couple months rolled on by.

I can't remember exactly when I got the fabric in the mail, but long story short: I finished with precisely one day to spare.  You know how sometimes life gets in the way of what really matters?  (i.e.: quilting)  Isn't that annoying?  Ugh!

So here it is: my contribution to the Iron Quilter 2 Challenge. *phew*

Iron Quilter 2 submission by Trina Peterson


Eat, Sleep, Sew, Repeat = Story of my Life!!
In hindsight, I wish I would've added some solids to break up the busy.  I think the words are easy enough to see, but I hope you can all pick out my rendition of a Singer Featherweight.  I used Diane Bohn's paper pieced alphabet pattern for the letters, but the Featherweight was all my own sketching and improv piecing.  The quilt top is made entirely with Lovely charm packs.  I quilt everything myself.  For this quilt I did 1/4" offset straight lines on my trusty Juki 2010Q.  The finished size is about 72" x 56".

Quilt Label
Judging for the Iron Quilter 2 competition will be done by the general public via a Google+ album by MSQC.  Photos will be displayed and each +1 = 1 vote.  I'll go ahead and play the politician: "Vote for me and all of your wildest dreams will come true!"  But even if you don't vote for me, I hope you'll check out the pictures.  It will be fun to see what everyone put together using the secret ingredient.  If you're new to Google+, you need a free google email (gmail) account to vote.  You can sign into your gmail account when you go to the album and then you will be able to vote (+1) your favorite entries.  You also may submit comments, but they don't count as votes.

CLICK HERE TO VOTE FOR MY QUILT WITH YOUR GMAIL ACCOUNT!  (You must click the +number button when you get there to actually vote.)

They opened up voting today (12/3) on Facebook as well.  CLICK HERE TO VOTE ON FACEBOOK!  (You must be signed into your Facebook account and click "Like".)

Thanks for stopping by!  Happy quilting. :)


Saturday, October 26, 2013

Introducing The Cascade Quilt

I'm excited and honored to introduce a new pattern by my friend, Susannah Kate:  

Cascade Quilt


I had the pleasure of meeting Susannah Kate last spring at the first ever Sew South Retreat.  Her new quilt pattern is great for beginner and advanced quilters alike.  It goes together quickly, but is also fun.  The directions are clear and concise.  Best of all, the result reminds me of one of the greatest games of my childhood: Tetris!


The Cascade Quilt pattern is now available for purchase in Susannah Kate's Etsy shop, https://www.etsy.com/shop/SusannahKateSews.  She has generously offered to give away one pattern at each of the stops on our blog hop.  The first reader to post a comment at the end of my post will receive the pattern for free in PDF format.


There are 10 stops on our Cascade Quilt Blog Hop.  This is the first!  The schedule for the rest of the hop is below.  Please stop by to see pictures of everyone's own special version of the Cascade Quilt.  If you don't win the free pattern here, maybe you can snag it at another participant's blog.


Cascade Quilt Blog Hop Schedule

Oct 26 Trina @ www.trinapeterson.com
Oct 28 Diane @ www.randomthoughtsdoordi.com
Oct 29 Jenny Mae @ www.ohjennymae.com
Oct 30 Courtney @ www.monpetitlyons.blogspot.com
Oct 31 Heather @ www.quiltsinthequeue.com
Nov 2 - Summer @ www.artfulife.blogspot.com
Nov 3 Susannah Kate @ www.susannahkate.com

Also, please visit Amber @ www.olivegypsy.wordpress.com . She has written a great post about the Cascade quilt pattern and has such cute pictures!

We are all “Instagrammers” and have a wonderful feed under the hashtag #cascadequilt . You will find more wonderful examples of the Cascade quilt including a beautiful one made with all solids! Include your own Cascade quilt We’d all love to see it! 
Log Cabin Pin Cushion


Susannah Kate's pattern leaves few scraps behind - the sign of a conservative quilter!  However, with the little pieces left over, I put together a few fun pinnies.


   Click here to see my quick tutorial for a Log Cabin Pin Cushion you can make with your scraps.


Click here to download the tutorial in PDF format for free!


Thanks for stopping by!

Friday, October 25, 2013

Log Cabin Pin Cushion Tutorial

Log Cabin Pin Cushion Tutorial 
by Trina Peterson 


Supplies:
Scrap Strips
  • Assorted fabric scraps at least 1.25" wide and various lengths
  • A piece of backing fabric as big as you want the cushion (or you can piece this from smaller scraps)
  • Polyester Fiberfill
  • Rotary Cutter, Gridded Ruler, Cutting Mat
  • Scissors
  • Sewing Machine
  • Thread
  • Iron & Board


Cutting Instructions:
  • Cut fabric scraps into 1.25" strips
  • Cut two 1.25" squares out of 2 different color scraps

All seams are 1/4".


Step 1:

Begin with the two 1.25" squares.  Place them rights sides together and sew along one side.  Turn and press.

Step 2:

Step 2
Place a strip lengthwise and right sides together along one of the long sides from the two pieces you just stitched together (aligning edges).  Leave the strip a little longer at both ends (1/4" or less). Sew along the outer lined-up edge.  Turn and press.  Use the ruler and rotary cutter to square up the longer edges to match the first two pieces.


Step 3:

Continue sewing on strips in a clockwise rotation (as shown below), making the block larger with each additional strip.

Step 3
Step 3
Step 3

Step 4


Step 4:

When the front/block piece is at the size you want for your cushion, place it right sides together onto the backing fabric piece.  Trim the backing piece to match the size of the front.


Step 5


Step 5:


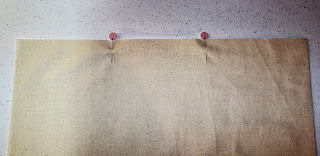
With the front and back still right sides together, place two pins about 2" apart along one edge.


Step 6


Step 6: 

Starting at the pin on the right, sew all the way around until you get back to the pin on the left.  Leave the 2" space open.  Back-stitch at the start and stop.  Clip the corners.


Step 7:

Turn the cushion right sides out through the opening.  Use a blunt tool (like a chopstick) to poke out the corners.  Press flat making sure the raw edges from the opening are tucked inside matching the seam allowance.

Step 8
Step 8:

Stuff the cushion with fiberfill through the opening until it is as firm as you like.  Pull the fill out of the bag/box in little bits to fluff it up.


Step 9:

Slip-stitch the opening closed, and you are done!  

If needed, find instructions for the slip-stitch at www.wikihow.com/Slip-Stitch.  Go to the bottom of the page to find the slip-stitch for hand-sewing.  There is also a great class on Craftsy.com that includes excellent instructions/demo for slip-stitching: Sewing Studio with Diana Rupp.  This is an awesome class for beginners!

For a different look, try making the strips different widths.  You can see examples of this in my picture below.  Just remember to square up the sides with your ruler and rotary cutter after adding each strip!

Variety in Strip Sizes

Monday, October 21, 2013

Pillow Form Tutorial

You know what I hate?  Pillow forms that cost a boat-load.  You know what else I hate?  Pillows you buy in stores that don't have a removable, washable cover!  Gah!  Sometimes, I just want to wash my pillow covers, ya know?

If you hate these things even half as much as I do, here is a reasonably-priced, fun solution:

Make your own!

Muslin and Fiberfill are CHEAP.  (I bought a 5 lb box of fill today at Jo-Ann for $11 after a 50% coupon; that will make like a ga-jillion pillows.)  So here is a quick tutorial for how to make your own pillow forms.  Soon to follow this will be another tutorial to make a pillow cover with an easy-to-install zipper.  I know this type of project is incredibly simple - no directions required - for a lot of my sew-y friends.  However, when I first began sewing, I had a hard time finding directions for really simple stuff that I had no idea how to do.  So these directions are for all the newbs out there.  Welcome to the wonderful world of stitching!

I'm still a newb at writing these tutorials and patterns and such.  If you have any comments, questions, or find anything that is unclear, please email me!  I'd love to get any feedback!  trina at trinapeterson dot com

If you'd like to download a printable copy of this tutorial in PDF format, please click here.


Finished Size: approximately 15" square

Supplies & Tools:


  • 1/2 yd Muslin
  • Polyester Fiberfill
  • Rotary Cutter, Gridded Ruler, Cutting Mat
  • Scissors
  • Sewing Machine
  • Thread
  • Straight Pins


Cutting Instructions:


  • Cut 2 pieces of Muslin 16" x 16"  


Step 1:

Place the two pieces of muslin one on top of the other.  Place two pins 5" apart in the middle of one side.


Step 2:

With a 1/2" seam allowance, begin stitching at the pin on the right and continue all the way around to the other pin on the left.  Back-stitch at both ends.


Step 3:

Clip the corners to about 1/4" from the seam.  Turn the pillow right sides out through the 5" opening.  Poke out the corners with a small blunt tool (like a chopstick).  Press flat, making sure the raw edges at the opening are tucked inside matching the rest of the seam allowance.


Step 4:

Using the 5" opening, stuff the pillow with fiberfill to your desired firmness.  Pull the fiberfill apart in little bits when taking it out of the bag/box, so that it fluffs up.


Step 5:

When fiberfill is in place, pull the edge with the opening taught until the two sides of the opening align. Pin in place.


Step 6:

Using an 1/8" seam allowance, stitch the opening closed.  Back-stitch at both ends.  You will need to push the fiberfill aside and hold the edge flat to maneuver under the presser foot.


You are finished!  Enjoy your new pillow form, and prepare to make an easy, custom, washable pillow cover with zipper with my next tutorial!


Thursday, October 17, 2013

Block Lotto Quilt

In July I was the lucky winner of the MadModQuiltGuild's monthly Block Lotto!  This completely contradicts what I said in my last post: that I never win anything.  Ok, I usually don't win anything.

How it works is that each month members have the choice to make as many blocks as they desire to enter into our monthly block lotto.  Our events coordinator selects the block pattern and color palette in advance.  The number of blocks each members brings equals the number of entries she gets for the lotto.  A name is drawn and that winner walks away with all of the blocks - free and clear to do with them as she wishes.  The only rule is that the winner can not win any subsequent lottos until she returns to a meeting with her finished project.

I am still a baby in the quilting world.  That is my excuse for not knowing what the heck to do with my blocks!  After much deliberation, I decided to go with the ol' standby: appliqué.  Using the color palette for the blocks, I made a big background of solid Kona strips (twin-size for my naked spare-bed).  Then I cut the blocks into circles and applied my beloved Steam-A-Seam2Lite fusible web.

Then this happened:


I pinned those suckers in place and zig-zagged around them like nobody's business.  

The backing I stumbled across at Jo-Ann made my day.  Navy.  Scissors.  Awesome!  And just for good measure, I added an embroidered quilt label.  Observe:


Notice anything out of place?  THAT'S RIGHT!  In true Trina-is-a-Spaz fashion, I stitched the wrong year on there.  Uh...DUH!  It wasn't until I was about to throw the thing in the washer that I realized my error, so I said "eff it."  A couple months off - no big deal.

Overall, I'm pretty happy with the outcome.  I definitely got the "modern" part down on this one.

What I like best is that there is a story...something with which to bore my house guests when they make the mistake of asking about the quilt on the spare bed. 

Thanks to the gals at the MadModQuiltGuild who made blocks (er...circles) for this quilt!


Keef Peterson

And just because she's nosy...Keef says, "What're y'doin?"


Tuesday, October 1, 2013

I'm Going!!!

It's official...I got my ticket for Sew South 2014!!!

I consider myself to be VERY lucky, because the dang thing sold out in less than 2 minutes!  How crazy is that?  I'm sure Jennifer Mathis, founder of Sew South Retreat and designer/author at EllisonLane.com already has a waiting list a mile long.  Many lovely ladies did not get a ticket, and they will be sorely missed in March.  It was only a stroke of luck for those of us to managed to obtain one.  I think I may have scared Mr. Sexy Pants when I came barreling through the door this evening bouncing up and down with delight!


Di & Amy in our Skirt Block Class
On another note, I recently returned from Sewing Summit 2013 in Salt Lake City, Utah.  It was a valuable educational experience, but also loads of fun.  I got to reunite with some of my friends who attended Sew South earlier this year, as well as make a few new gal pals.  The bonds that can sometimes be forged between people in such a short period of time truly amaze me.  I highly value the friendships I have been fortunate enough to develop with these incredible women.  We all have in common a passion for sewing and creativity.  The community of sewists of which I have become a part is inspiring and wonderful.  These ladies make me smile all the way to my soul, and I look forward to traveling across the country to spend bits of time with them whenever possible, as well as keeping up with them through their blogs and Instagram.  The internet has completely changed the world and allowed people worldwide to connect in ways that are magical.  We are lucky to live in such an age.

I used my iPhone to take a few pics at Sewing Summit, so the image qualities are not perfect, but here a a few glimpses:
Swap Gift

This is the awesome secret swap gift I received from  Christina.  She was so very generous and thoughtful.  Upon giving me the gift, she mentioned that she had a hard time figuring out what to give.  She definitely hit the nail on the head!  Her feather theme delighted me.  She obviously did her spy homework well.  Besides picking up on my love for my bird, Keef, she also saw that I have been dabbling with hexies and that I have a "slight" affinity for all things pink.  Well done, Christina, and a million thanks!  Check out Christina's awesome blog & patterns at http://sometimescrafter.blogspot.com .


Modern Baby
At one of our lunches at Sewing Summit, we walked into the dining room to place settings with sample batting and a single book as the center piece.  It was subsequently announced that the gal with the ticket under her bread plate at each table won the book.  I never win anything!!  But I did this time.  :)  What makes this book even more special is that it features quilts from two of my Sew South friends, Dana from http://oldredbarnco.blogspot.com (hers is on the cover) and Lindsey from http://lrstitched.com .  The book is Modern Baby, and here is a link to it on Amazon.


Booooooo!

It just so happened that my birthday fell while I was at Sewing Summit.  I don't care much about birthdays anymore, since nothing good comes from birthdays after 25 (insurance goes down).  I was determined to get by undetected.  BUT I WAS BETRAYED!  My Sew South 2013 roommate and friend, Cindy from http://cindyloussouthernsewing.blogspot.com, wasn't able to make it to Sewing Summit unfortunately, but she DID manage to spread the word from GEORGIA along to our friend, Di of http://www.randomthoughtsdoordi.com .  On the evening of my (what I will only admit to as another 25th) birthday, a group of us were finishing up a fantastic (best Mexican food I've ever had) supper when the waiters arrived in all their accented sing-song glory to embarrass me.  At least the cake was delicious.  :)   If you're ever in SLC, you must try out the Red Iguana.  The food is rockin' and the wait-staff is wonderful.  And P.S...the Margaritas pack quite a nice punch.

Since this post is all about my lovey-dovey feelings for my sew-ey friends, I can't end without mentioning my fabulous Sewing Summit roommate, Andrea, who flew all the way from British Columbia to attend.  It was great to have a fellow Canadian around!  (In fact there were quite a few.)  We got to talk about fun stuff like good ol' Canadian beer, funny accents, in-climate weather, and the problems that face Canadian sewists, eh?  Their fabric prices are ridiculously high!  Poor souls.  I admire their dedication despite the annoying obstacles and over-priced everything.  Even though I'm really only a half-breed, it's amusing to talk about all the differences between here and there.  It's funny how two countries can be so close and similar, but also so very far apart and different.  Check out Andrea's blog, http://doonbug.com .  She also makes beautiful high-quality, hand-crafted couture purses that you can purchase through her Etsy Shop .

Last but not least is my favorite shot from the entire weekend:


Much love to my friends.  Can't wait to see some of you again in March!

Thursday, September 5, 2013

Needle Book

Ever since I learned how to use a sewing machine , the thought or mention of hand-stitching inevitably produced a grimace on my face.  Who would want to spend all that time sewing by hand when you can zip through a project on a machine at lightening speed?

As I've come to expand my horizon, an appreciation for a little hand-stitching has developed.  I have to admit that it kind of snuck up on me.  The first couple quilt bindings I did on the machine looked absolutely dreadful.  A few months ago, I finally gave in and hand-stitched a binding on a small wall quilt (Keef's quilt: previously showcased).  It wasn't perfect, but I certainly saw potential in that almost invisible stitch.  The cosmetic case I made and wrote about a couple weeks ago was another recent "finished by hand" project.  When I saw Lindsay Rhodes's instructions to finish the case by hand, I'll admit to putting the project on the back burner.  But eventually I gave in, because it's just too cute a thing to ignore.  The result made me smile, and I made 2 more cases the following day.  I must confess that I did machine-stitch some fold-over-elastic for the binding on one of the 2 extra cases.  It didn't look nearly as nice as the two that were hand-stitched with a traditional binding.  That's what I get for being impatient.

Hexies were another thing I dreaded.  Thanks to my local Modern Quilt Guild Chapter, I was sort of forced into giving those a go as well.  The gang at PaperPieces.com were generous enough to donate a whole stack of little hexie templates to our guild a while back.  Our Events Officer handed them out at a monthly meeting at the beginning of the summer and challenged us to try them out and make a hand-stitched project to show in September.  Those who participate in the challenge will be entered for a prize drawing at our September meeting.  I ended up appliquéing a couple of my hexie flowers onto one of my Cinch-It-Up Market Bags.  They are just too cute and incredibly addictive.  What a great little project to take along on a road trip or to the in-laws for the weekend (where I am sadly deprived of my sewing machines and don't know what to do with myself when I don't have a piece of fabric in my hands - I'm sure they think I'm crazy).

Wow, I really can go on about almost nothing, can't I?  I should get to the point of this whole story which is...

This evening I made this:


It makes me so happy that I get a funny little tickle in my tummy.  I'll be off to Sewing Summit in a couple weeks, and I was determined to have an incredibly fancy Needle Book to take with me.  I stitched up a plain and boring one a few months ago when I got hooked on the hexies, but this one is infinitely better.

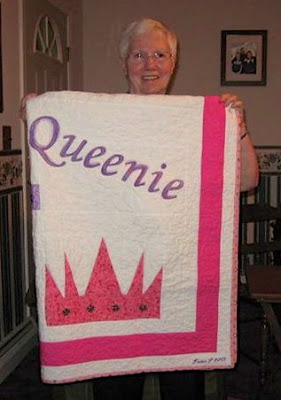
I gather that drinking tea is a little trendy almost everywhere nowadays - must be all the antioxidants and the increasing obsession with health food.  Growing up in New England, however, means that coffee  (the anti-tea) was somewhat foreign to me.  When you go to visit friends and relations in Maine, the first thing they offer you when you arrive is a cuppa tea and somethin' sweet to go with it.  I get a kick out of watching Downton Abby with all the tea-times, because that is what it was like for me in Maine (except without all the fancy hats and sitting straight as a board with your ankles crossed).  And we drink our tea in mugs.  I will admit to having a strong affinity for fancy tea cups and pots, though.  Frannie ("Queenie") surprised me last summer by letting me have most of her (now 54-year-old) Bone China tea sets that were her wedding gifts.  They are (collectively) one of my favorite things.  Once in a while when I'm feeling the need for something a little fancy I make an entire pot of tea (in a fancy teapot) and take it down to the shop with a fancy little teacup.  It goes great with the Oreos.

Blah blah blah...hence the teacup paper piecing patterns on my new Needle Book.  I love teacups.  There you have it.  They don't have much to do with sewing, but what the heck.  They're cute.  I drink tea while I sew, so I guess tea and sewing go together in my world.

I found the teacup paper piecing patterns for free at PieceByNumber.com.  Click here for the direct link.  I used Lindsay's vinyl zipper pocket method from the Cosmetic Case.  Instead of the traditional Button & Loop closure you find on most needle books, I used a couple Poly-Resin snaps, because they are fun and I have a ga-jillion of them.

Cheers!

Sunday, September 1, 2013

Cinch-It-Up Market Bag

I've got a fun & easy new pattern done up for a Market Bag with a handy-dandy elastic & cord lock combo to prevent those annoying grocery spills in the trunk or truck-bed.


Fancy it up with those hexies you've been making on your summer road trips that you don't know where to put.  Or you can re-purpose an old fabric shower curtain like the one I used in my pattern.  I found this one for $1 at a neighborhood garage sale!

You can get the pattern in my Craftsy Pattern Shop for the low low price of 99 pennies by clicking here.

Or you can leave a sweet comment at the bottom of this blog with your email address and I'll send it to you for free! :)     ...just cuz I love ya.

Go Green.  Or Pink!  (which is so much prettier)


Monday, August 26, 2013

Crowns for Queenie

A couple months ago I was pondering what in the world to give my aunt for her big upcoming milestone birthday: 75!!  She's impossible to shop for.  Plus, I like making stuff...so this happened:


If by chance you have read my previous post titled, "A Bag Fit for the Queen", you'll already know a little bit about my beloved Frannie.  "Queenie" is what we call her, and rightly so.

Frannie is a Maine-er, and you don't find too many couches in Maine without a blanket thrown over it.  I thought a new quilt would be perfect for her winter nights curled up in front of the TV hollering at the Celtics and the bad referree-ing...one of her favorite pastimes.

It didn't take me long to think of a good motif for the Queen's quilt.  Crowns!  Duh!  So I started sewing pieces together and trying to make something that somewhat resembled a crown.  Then I thought...well Queenie needs a crown for every occasion.  So these are what emerged:


This is her Glamour Crown.  She wears this one when she paints her toenails and gets all dolled up to go out with her girlfriends for Church Suppers and such.  The buttons are shinier in person. :)


This is her Housework Crown.  She wears it when she's scrubbing her "throne".


Here is her Business Crown.  This alerts everyone around when "Frannie Means Business"


This fancy one is her Coronation Crown.  When she puts this one on, we know it's time to roll out the Red Carpet.

Here is her Card Game crown.  Because come on...it's just fun.  She hopes the bright colors will distract the boys team so that the girls can win a hand for a change.


This huge crown is worn only for special occasions.  It seems to provoke things like free first-class upgrades and opening up of the car door.  It let's 'em know that someone important has come to town.

Frannie's Princess Crown is always accompanied by the sweetest, meekest smile she can muster and maybe a bat of the lashes.  She puts this on when she's picked something pricey out of the Lands End Catalog for Christmas.


Last but not least is the Cookin' Crown.  It is the most glorious of all. She adorns this heavyweight when she's cookin' up her magic in the kitchen.  I hope she will remember who made her this crown in particular the next time she bakes a batch of cookies.  She might get the urge to send a Priority box to Wisconsin.


Although I wasn't able to be in Maine at Frannie's 75th birthday celebration, I was fortunate enough to see her on Skype when she opened up her quilt.  The party go-ers got a good laugh, and so did Frannie.  Ironically enough, her two loving sons had a custom birthday cake made for her that said, "Happy 75th Birthday Queenie".  We did not coordinate.  When the planets align, they sure do get it right! 

Happy Big One, Queenie!!  xoxo