If you hate these things even half as much as I do, here is a reasonably-priced, fun solution:
Make your own!
Muslin and Fiberfill are CHEAP. (I bought a 5 lb box of fill today at Jo-Ann for $11 after a 50% coupon; that will make like a ga-jillion pillows.) So here is a quick tutorial for how to make your own pillow forms. Soon to follow this will be another tutorial to make a pillow cover with an easy-to-install zipper. I know this type of project is incredibly simple - no directions required - for a lot of my sew-y friends. However, when I first began sewing, I had a hard time finding directions for really simple stuff that I had no idea how to do. So these directions are for all the newbs out there. Welcome to the wonderful world of stitching!
I'm still a newb at writing these tutorials and patterns and such. If you have any comments, questions, or find anything that is unclear, please email me! I'd love to get any feedback! trina at trinapeterson dot com
If you'd like to download a printable copy of this tutorial in PDF format, please click here.
Finished Size: approximately 15" square
Supplies & Tools:

- 1/2 yd Muslin
- Polyester Fiberfill
- Rotary Cutter, Gridded Ruler, Cutting Mat
- Scissors
- Sewing Machine
- Thread
- Straight Pins
Cutting Instructions:
- Cut 2 pieces of Muslin 16" x 16"
Step 1:
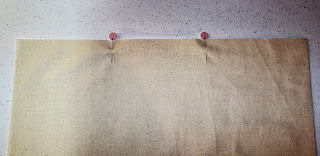
Place the two pieces of muslin one on top of the other. Place two pins 5" apart in the middle of one side.
Step 2:
With a 1/2" seam allowance, begin stitching at the pin on the right and continue all the way around to the other pin on the left. Back-stitch at both ends.

Step 3:
Clip the corners to about 1/4" from the seam. Turn the pillow right sides out through the 5" opening. Poke out the corners with a small blunt tool (like a chopstick). Press flat, making sure the raw edges at the opening are tucked inside matching the rest of the seam allowance.
Step 4:
Using the 5" opening, stuff the pillow with fiberfill to your desired firmness. Pull the fiberfill apart in little bits when taking it out of the bag/box, so that it fluffs up.

Step 5:
When fiberfill is in place, pull the edge with the opening taught until the two sides of the opening align. Pin in place.

Step 6:
Using an 1/8" seam allowance, stitch the opening closed. Back-stitch at both ends. You will need to push the fiberfill aside and hold the edge flat to maneuver under the presser foot.
You are finished! Enjoy your new pillow form, and prepare to make an easy, custom, washable pillow cover with zipper with my next tutorial!


Awesome! Using a chopstick is brilliant!
ReplyDeleteThanks Wendy! But I can't take full credit...I read it somewhere a while back. :)
Delete